Jumat, 26 September 2008

Open Source Windows (1)

Web Browsing

Mozilla Firefox

The premier free, open-source browser. Tabs, pop-up blocking, themes, and extensions. Considered by many to be the world's best browser.
Download Page


Video Player / Video Podcasting


Miro

Beautiful interface. Plays any video type (much more than windows media player). Subscribe to video RSS, download, and watch all in one. Torrent support. Search and download from YouTube and others.
Download Page

Senin, 15 September 2008

Be Effective in Search Engine (1)

Search Engine sekarang sudah bisa dibilang salah satu tools dalam kerja atau melakukan kegiatan apapun. Dan karena saya menghabiskan di online media jadi memang Search Engine adalah keseharian kita. Dan dari situ kita bisa punya jawaban untuk apapun.

Ini juga jadi habbit hampir sebagian besar mereka yang menggunakan internet. Studi yang dilakukan salah satu lembaga research bahkan ada yang menemukan bahwa Yahoo dan Google adalah 2 situs yang paling banyak dibuka oleh pengguna internet di Indonesia sewaktu mereka online di rumah/warnet/kantor.

Mendapat jawaban apapun di Search Engine itu memang dalam arti yang sebenernya. Saya sekarang untuk tahu alamat dan nomer telpon automatically mencari di SE dibanding nelpon ke 108. Atau mungkin saya baru kenalan sama orang dan tertarik untuk tahu lebih jauh tentang orang itu, biasanya saya langsung ketik namanya yang ada di Business Card dia dan Search.

Atau beberapa waktu lalu ada teman dapet tawaran kerja di Google, teman saya penasaran ini orang dari Google beneran bukan sih, saya cari langsung saja dan ternyata memang beneran orang Google. Banyak HRD di perusahaan juga yang sebelum merekrut karyawan mereka biasanya cari dulu di Search Engine. Jadi memang benar-benar pintu dari segala informasi yang ada saat ini.

Untuk menghemat waktu, berikut beberapa tips bagaimana menggunakan SE yang efektif :

1. Sebenarnya yang penting adalah pakai logika yang baik untuk melakukan pencarian serta gunakan kata-kata spesifik untuk membantu pencarian. Sebaiknya menggunakan kombinasi 2 kata supaya jawabannya tidak terlalu luas.

2. Untuk proses pencarian, tidak usah pusing sama huruf besar kecil karena kalau nulis misalnya sastro menggolo, pake sastro menggolo, Sastro Menggolo dan SaStRo mEnGgOlO hasilnya akan sama saja. Mesin pencari tidak membedakan huruf besar dan kecil.

3. Jangan ketikkan pertanyaan, tapi coba untuk mengetikkan seperti sebuah fakta atau pernyataan. Misalnya untuk tahu berapa tinggi tugu muda, jangan ketik berapa tinggi tugu muda, tapi coba tinggi tugu muda * m

Selain itu sebenarnya ada beberapa cara untuk membuat proses pencarian di search engine jadi lebih efektif, dan sebagai hasilnya bisa mempercepat proses pencarian.

1. Frase Match
Langsung pake contoh ya, misal mau cari apotik sehat, dengan yang biasa seperti ini Google akan mencari kata apotik sendiri & jaya sendiri, kemudian hasilnya dijadiin satu.
Untuk bisa dapet bener-bener apoik jaya dalam rangakaian kata bisa pake tanda kutip ganda (double quotes). Jadi ”apotik sehat”.
Nah nanti hasilnya adalah persis apotik sehat (nggak sendiri2).
Ini bisa diganti juga dengan dashed (-) atau dot/titik (.).

2. Filterize
Terus juga bisa eliminir salah satu kata kunci dengan tanda minus (-) misalnya mau nyari apotik sehat tapi bukan di daerah pemuda, bisa dicari ”apotik sehat” – pemuda. Hasilnya adalah apotik sehat yang bukan berada di daerah jalan pemuda.

3. Range
Atau misalnya lagi nyari hanphone baru dan Cuma punya budget antara 1 – 2 juta, nah bisa nyari-nyari hp apa saja yang ada di dalam budget itu. Caranya: ketik aja handphone 1000000…2000000. Dan akan mendapatkan hasil pencarian hp dengan harga diantara 1-2 juta. Jadi fungsi … untuk mencari nilai diantara dua angka yang mengapit.

4. Fill in
Dengan tanda bintang (*) kita bisa minta google untuk menyisipkan segala data diantara keyword search kita.
Misal: tinggi tugu muda * m
Ini berarti nyari tinggi tugu muda entah berapa dalam meter.

Selasa, 09 September 2008

Earn Money from DailyClicks

Almost similar to Buxto, DailyClicks.biz is also a PTC (Pay To Click) program which will pay us after seeing advertisement for 30 seconds.

In DailyClicks, we will get $0.01 (or $0.02 for premium member) after seeing 1 advertisement. Fortunately, the number of advertisements in DailyClicks.biz is quite plenty, even for a free member! When a referral see an advertisement, we will receive $0.005 (or $0.01 for premium member).

For cashout/payment process, I think DailyClicks is more interesting than Buxto because the cashout is opened every 1st and 15th of the month after you have certain balance there (free member is $10 and premium member is $5). Also, if you are a premium member, you can withdraw money whenever you have $100 balance.

Join to DailyClicks NOW!! Ensure you have opened an account in Paypal.

Earn Money from Buxto

Earn Money from Buxto

We always see advertisements, either in television program, or in movie theatre, etc. Unfortunately we do not receive any financial benefits by seeing advertisement activities. Now in Internet there are online money earning opportunities by doing this, which is called PTC (Pay to Click) and PTR (Pay to Read) program.

One PTC program interesting for me is Buxto. Here, each time we see online advertisement, we will earn $0.01 (or $0.0125 for premium member). As a member, we will see approx 14-17 advertisements everyday, which means the potential earning in Bux.to is $0.14 - $0.17 /day.

The most interesting part is we can introduce the Bux.to PTC program to our friends or other people and we will have 100% benefits from their earnings! So if we have 100 referrals, and each referral see 15 advertisements /day, then we can have 100 x $0.15 = $15 /day (or equivalent to $450 /month)!! Very interesting, isn't it??

Register yourself in Buxto NOW!! Ensure you have registered yourself in PayPal.com.

Earn Money Online

Earn Money Online

Earn money online from Internet is phenomenal. A lot of people have been earning huge amount of money from Internet. Unfortunately, I just captured this opportunity in the end of year 2007. I would like to share my stories on this topic for all of you.

Phase #1: Build a good daily earning
Building a good daily earning is very important for a starter like me. It is useful so that we can have enough money to invest on other online business opportunities. Here I recommend to use PTC/PTR (Pay To Click and Pay To Read) program because it is very easy to do by anyone with Internet access. Ensure you join the trusted PTC/PTR program; check the scheme and TOS (Terms of Service) thoroughly, and search for references in the Internet). BTW, ensure to use the networking power to leverage our earning by recruiting/buying referral.

  1. Create a PayPal account ASAP so that you can receive money from this online business. In this business, having PayPal account is a must.
  2. Buxto is my first PTC program, and it seems the result is good for a starter like me. You can also read my detailed article from Bux.to.
  3. Daily Clicks is my preferred PTC program since it seems the payment is much faster than Bux.to; thus it is very helpful for arranging the cashflow. Please read my detailed article from DailyClicks.biz.

Kamis, 31 Juli 2008

100 Shortcut Bagi Pengguna Windows

Here are 100 keyboard shortcuts to pace up your work and Impress others :

  • CTRL+C (Copy)
  • CTRL+X (Cut)
  • CTRL+V (Paste)
  • CTRL+Z (Undo)
  • DELETE (Delete)
  • SHIFT+DELETE (Delete the selected item permanently without placing the item in the Recycle Bin)
  • CTRL while dragging an item (Copy the selected item)
  • CTRL+SHIFT while dragging an item (Create a shortcut to the selected item)
  • F2 key (Rename the selected item)
  • CTRL+RIGHT ARROW (Move the insertion point to the beginning of the next word)
  • CTRL+LEFT ARROW (Move the insertion point to the beginning of the previous word)
  • CTRL+DOWN ARROW (Move the insertion point to the beginning of the next paragraph)
  • CTRL+UP ARROW (Move the insertion point to the beginning of the previous paragraph)
  • CTRL+SHIFT with any of the arrow keys (Highlight a block of text)
  • SHIFT with any of the arrow keys (Select more than one item in a window or on the desktop, or select text in a document)
  • CTRL+A (Select all)
  • F3 key (Search for a file or a folder)
  • ALT+ENTER (View the properties for the selected item)
  • ALT+F4 (Close the active item, or quit the active program)
  • ALT+ENTER (Display the properties of the selected object)
  • ALT+SPACEBAR (Open the shortcut menu for the active window)
  • CTRL+F4 (Close the active document in programs that enable you to have multiple documents open simultaneously)
  • ALT+TAB (Switch between the open items)
  • ALT+ESC (Cycle through items in the order that they had been opened)
  • F6 key (Cycle through the screen elements in a window or on the desktop)
  • F4 key (Display the Address bar list in My Computer or Windows Explorer)
  • SHIFT+F10 (Display the shortcut menu for the selected item)
  • ALT+SPACEBAR (Display the System menu for the active window)
  • CTRL+ESC (Display the Start menu)
  • ALT+Underlined letter in a menu name (Display the corresponding menu)
  • Underlined letter in a command name on an open menu (Perform the corresponding command)
  • F10 key (Activate the menu bar in the active program)
  • RIGHT ARROW (Open the next menu to the right, or open a submenu)
  • LEFT ARROW (Open the next menu to the left, or close a submenu)
  • F5 key (Update the active window)
  • BACKSPACE (View the folder one level up in My Computer or Windows Explorer)
  • ESC (Cancel the current task)
  • SHIFT when you insert a CD-ROM into the CD-ROM drive (Prevent the CD-ROM from automatically playing)

Dialog Box Keyboard Shortcuts

  • CTRL+TAB (Move forward through the tabs)
  • CTRL+SHIFT+TAB (Move backward through the tabs)
  • TAB (Move forward through the options)
  • SHIFT+TAB (Move backward through the options)
  • ALT+Underlined letter (Perform the corresponding command or select the corresponding option)
  • ENTER (Perform the command for the active option or button)
  • SPACEBAR (Select or clear the check box if the active option is a check box)
  • Arrow keys (Select a button if the active option is a group of option buttons)
  • F1 key (Display Help)
  • F4 key (Display the items in the active list)
  • BACKSPACE (Open a folder one level up if a folder is selected in the Save As or Open dialog box)

Microsoft Natural Keyboard Shortcuts

  • Windows Logo (Display or hide the Start menu)
  • Windows Logo+BREAK (Display the System Properties dialog box)
  • Windows Logo+D (Display the desktop)
  • Windows Logo+M (Minimize all of the windows)
  • Windows Logo+SHIFT+M (Restore the minimized windows)
  • Windows Logo+E (Open My Computer)
  • Windows Logo+F (Search for a file or a folder)
  • CTRL+Windows Logo+F (Search for computers)
  • Windows Logo+F1 (Display Windows Help)
  • Windows Logo+ L (Lock the keyboard)
  • Windows Logo+R (Open the Run dialog box)
  • Windows Logo+U (Open Utility Manager)

Accessibility Keyboard Shortcuts

  • Right SHIFT for eight seconds (Switch FilterKeys either on or off)
  • Left ALT+left SHIFT+PRINT SCREEN (Switch High Contrast either on or off)
  • Left ALT+left SHIFT+NUM LOCK (Switch the MouseKeys either on or off)
  • SHIFT five times (Switch the StickyKeys either on or off)
  • NUM LOCK for five seconds (Switch the ToggleKeys either on or off)
  • Windows Logo +U (Open Utility Manager)

Windows Explorer Keyboard Shortcuts

  • END (Display the bottom of the active window)
  • HOME (Display the top of the active window)
  • NUM LOCK+Asterisk sign (*) (Display all of the subfolders that are under the selected folder)
  • NUM LOCK+Plus sign (+) (Display the contents of the selected folder)
  • NUM LOCK+Minus sign (-) (Collapse the selected folder)
  • LEFT ARROW (Collapse the current selection if it is expanded, or select the parent folder)
  • RIGHT ARROW (Display the current selection if it is collapsed, or select the first subfolder)

Shortcut Keys for Character Map

  • After you double-click a character on the grid of characters, you can move through the grid by using the keyboard shortcuts:
  • RIGHT ARROW (Move to the right or to the beginning of the next line)
  • LEFT ARROW (Move to the left or to the end of the previous line)
  • UP ARROW (Move up one row)
  • DOWN ARROW (Move down one row)
  • PAGE UP (Move up one screen at a time)
  • PAGE DOWN (Move down one screen at a time)
  • HOME (Move to the beginning of the line)
  • END (Move to the end of the line)
  • CTRL+HOME (Move to the first character)
  • CTRL+END (Move to the last character)
  • SPACEBAR (Switch between Enlarged and Normal mode when a character is selected)

Microsoft Management Console (MMC) Main Window Keyboard Shortcuts

  • CTRL+O (Open a saved console)
  • CTRL+N (Open a new console)
  • CTRL+S (Save the open console)
  • CTRL+M (Add or remove a console item)
  • CTRL+W (Open a new window)
  • F5 key (Update the content of all console windows)
  • ALT+SPACEBAR (Display the MMC window menu)
  • ALT+F4 (Close the console)
  • ALT+A (Display the Action menu)
  • ALT+V (Display the View menu)
  • ALT+F (Display the File menu)
  • ALT+O (Display the Favorites menu)

MMC Console Window Keyboard Shortcuts

  • CTRL+P (Print the current page or active pane)
  • ALT+Minus sign (-) (Display the window menu for the active console window)
  • SHIFT+F10 (Display the Action shortcut menu for the selected item)
  • F1 key (Open the Help topic, if any, for the selected item)
  • F5 key (Update the content of all console windows)
  • CTRL+F10 (Maximize the active console window)
  • CTRL+F5 (Restore the active console window)
  • ALT+ENTER (Display the Properties dialog box, if any, for the selected item)
  • F2 key (Rename the selected item)
  • CTRL+F4 (Close the active console window. When a console has only one console window, this shortcut closes the console)

Remote Desktop Connection Navigation

  • CTRL+ALT+END (Open the m*cro$oft Windows NT Security dialog box)
  • ALT+PAGE UP (Switch between programs from left to right)
  • ALT+PAGE DOWN (Switch between programs from right to left)
  • ALT+INSERT (Cycle through the programs in most recently used order)
  • ALT+HOME (Display the Start menu)
  • CTRL+ALT+BREAK (Switch the client computer between a window and a full screen)
  • ALT+DELETE (Display the Windows menu)
  • CTRL+ALT+Minus sign (-) (Place a snapshot of the active window in the client on the Terminal server clipboard and provide the same functionality as pressing PRINT SCREEN on a local computer.)
  • CTRL+ALT+Plus sign (+) (Place a snapshot of the entire client window area on the Terminal server clipboard and provide the same functionality as pressing ALT+PRINT SCREEN on a local computer.)

Microsoft Internet Explorer Navigation

  • CTRL+B (Open the Organize Favorites dialog box)
  • CTRL+E (Open the Search bar)
  • CTRL+F (Start the Find utility)
  • CTRL+H (Open the History bar)
  • CTRL+I (Open the Favorites bar)
  • CTRL+L (Open the Open dialog box)
  • CTRL+N (Start another instance of the browser with the same Web address)
  • CTRL+O (Open the Open dialog box, the same as CTRL+L)
  • CTRL+P (Open the Print dialog box)
  • CTRL+R (Update the current Web page)
  • CTRL+W (Close the current window)

Jumat, 06 Juni 2008

Tips Membuka Toko Online

Sekarang ini, untuk berjualan tidak perlu punya toko. Lewat dunia maya pun, Anda bisa menjajakan produk. Bahkan, toko online punya banyak kelebihan. Sudah murah, calon pembeli pun bisa datang dari mana saja. Inilah tips membuat toko online agar memikat pelanggan.

1. MEMILIH TEMPAT

A. Gratisan
Ada beberapa tempat yang menyediakan fasilitas gratisan seperti blogger.com (blogspot), multiply.com, wordpress.com. Pada awalnya, fasilitas gratis ini adalah tempat kegiatan blogging pada umumnya seperti berbagi cerita dan foto. Namun, dalam perjalanannya, dimanfaatkan untuk kegiatan jualan. Memakai fasilitas ini cenderung mudah, bahkan sudah tersedia template tampilan yang lumayan banyak dan menarik.

B. Berbayar
Kini sudah banyak penyedia layanan toko online dengan sewa mulai Rp 750.000 per tahun dan bisa diperpanjang lagi. Harga tersebut sudah termasuk pembelian nama domain serta hosting selama setahun serta pelatihan maintenance. Dengan memakai layanan ini, toko online kita lebih serius dengan memakai alamat dan tampilan sesuai yang kita inginkan.

2. MEMILIH NAMA
Pilihlah nama domain dengan kata kunci yang gampang diingat dari jualan toko online Anda. Dengan memakai kata kunci ini, toko online kita gampang ditemui oleh pengunjung melalui mesin pencari (search engine). Misalnya saja, Anda menawarkan produk tas sekolah, pilih saja nama www.tassekolah.com.

3. BUATLAH ATURAN
Buatlah aturan dan tata cara belanja secara jelas dan mudah dipahami oleh calon pembeli seperti aturan pemesanan, pembayaran, dan pengiriman.

4. PASANG ALAMAT
Pasanglah alamat Anda, email, dan nomor telepon yang bisa dihubungi dengan jelas. Bila perlu, pasang foto Anda untuk lebih meyakinkan.

5. DAFTAR INTERNET BANKING
Pilihlah rekening bank yang memiliki jaringan nasional dan daftarkan rekening pembayaran toko Anda dengan fasilitas internet banking untuk memudahkan kontrol pembayaran dari pembeli produk Anda.

6. PENGIRIMAN
Kemas barang pesanan dengan memperhatikan segi keamananan. Pastikan barang tidak rusak sampai tujuan. Pilihlah jasa pengiriman yang terpercaya dan murah. Simpan nota/resi pengiriman untuk kontrol pengiriman.

CARA MENINGKATKAN PENGUNJUNG & PEMBELI
1. Lakukan promosi online melalui media-media iklan baris baik yang gratis maupun berbayar.
2. Bertukar link banner dengan sesama toko online.
3. Bergabunglah dengan komunitas-komunitas online.
4. Lakukan promosi offline dengan memanfaatkan kendaraan Anda atau teman, seragam kerja karyawan, kop surat, amplop, nota, kartu nama, hadiah/souvenir, dll. dengan memasang nama toko online Anda.
5. Berikan pengetahuan produk serta deskripsi produk dengan detail, jelas dan meyakinkan pengunjung untuk membeli. Tampilkan foto-foto produk semenarik mungkin.
6. Berikan penawaran-penawaran yang fantastik seperti potongan harga, hadiah, dll.

Rabu, 04 Juni 2008

Google Adsense Money Making Schemes

Google Adsense is a successful business model for publishers. It enables genuine content owners to monetize their content through ads served by the Adsense servers.

However, it appears that there is a proliferation of “Get Rich” schemes that are coming up across the globe which are becoming a source of concern.

Some of the schemes provide genuine services such as providing website templates or designing assistance for maximizing ad publications. Such services have a role to play and need to continue.

However, along with the genuine services there are many service offerings where the public are being lured into a membership of a scheme with a promise of “Monthly payments from Google” as if the servies are being used by Google. Such offerors collect some upfront money and use it for developing a website in the name of the member and placing adsense ads in these websites.

Most of these sites display content related to online casinos, pornographic stuff and other material which would attract a matching set of ads.

Though it is possible that these sites attract visitors and provide “Ad Views” and also provide occasional “Click Throughs” etc resulting in revenues flowing to the members in the form of cheques from Google, there is a need to spread a word of caution to those who subscribe to such memberships.

Firstly the member is providing authority express or implied to the service provider to create a website and place certain content there in for the purpose of generating some income for which he does not pt in any effort other than paying the membership fee. These are dummy sites with no real content and Google has every right to treat this as a “Fraud” on the Adsense scheme. It may stop payment and hence the member may lose the promised revenue.

Second and more dangerous aspect is that if the websites display content which are of pornographic type or promotion of legally banned online lotteries or say terrorist related information or distribute virus, then the responsibility for the illegal activity falls on the owner of the website.

I have therefore requested Google Adsense team to clarify on whether they recognize such schemes as “Frauds” and waiting for their reply.

In the meantime, I request Google to strengthen their system of clearing content owners for the purpose of ad sense eligibility and also take action against the service providers who are misusing the Google brand to collect money from the public under the above types of get-rich schemes.

Google needs to accredit genuine service providers who project their service fairly as “Template Creators” and” Advertising Agents”. But those who provide ready made website packages with content meant to take the adsense ads need to be dis accredited. For this purpose Google Adsense should display on the web a list of accredited and banned service providers so that public can use the services of the genuine service providers while avoiding others.

This caution posting has been placed in this forum for the special information of public in India where these schemes seem to be spreading like wild fire.

We have avoided providing the names of the specific service providers but those members of the public who have been lured for such memberships and not getting their payments may report to the undersigned through e-mail naavi@vsnl.com so that it may be brought to the notice of the larger sections of the public.

Kamis, 29 Mei 2008

Application Example with Masquerading

If you want to 'hide' the private LAN 192.168.0.0/24 'behind' one address 10.1.1.12 given to you by the ISP, you should use the masquerading function of the MikroTik router. Masquerading is useful, if you want to access the ISP's network and the Internet appearing as all requests coming from the host 10.1.1.12 of the ISP's network. The masquerading will change the source IP address and port of the packets originated from the network 192.168.0.0/24 to the address 10.1.1.12 of the router, when the packet is routed through it.

Masquerading helps to ensure security since each outgoing or incoming request must go through a translation process that also offers the opportunity to qualify or authenticate the request or match it to a previous request. Masquerading also conserves the number of global IP addresses required and it lets the whole network use a single IP address in its communication with the world.

To use masquerading, a firewall rule with action 'masq' should be added to the forward chain of the router's firewall configuration:

[MikroTik] ip firewall rule forward>
add action=masq interface=Public src-address=192.168.0.0/24
[MikroTik] ip firewall rule forward>
Flags: X - disabled, I - invalid
0 protocol=all src-address=192.168.0.0/24:0-65535
dst-address=0.0.0.0/0:0-65535 interface=Public action=masq
tcp-options=all log=no

[MikroTik] ip firewall rule forward>

Jumat, 11 April 2008

Another Look At Optimizations


We've given you many optimization tips over the years, and, as you know, it's important to consider how your ad implementations affect not only your click-through rate, but your users' and advertisers' experience as well. To support this, we'd like to remind you of the following two guidelines when optimizing your site.

1. Ads shouldn't be placed under a title or section heading in a way that implies that the ads are not ads.

For example, ads shouldn't be placed under titles such as “Dallas Business Opportunities” or “Today's Hot Deals”. Placing ads directly below titles such as these implies to your users that the links in the ads are publisher-created content. The example below shows a placement that does not follow this guideline.


2. Ads should be easily distinguishable from surrounding content.

Similarly, you should not place an ad unit by a group of links that has identical colors and line spacing. Doing so may cause users to think the ad unit is content created by you. In this situation, we recommend using a different color for the ad titles or indenting the ad unit to help distinguish the ads from your own content. This screenshot shows an implementation that does not follow this guideline:


As you can imagine, users who click on ads that they think are publisher-created content may lose trust in your site and decide not to return in the future. It's important to keep their interests in mind, as well as your own.

Also, advertisers can tell which sites have a high conversion rate for them using Placement Performance reports. A conversion occurs when a click on an ad leads directly to user behavior that the advertiser deems valuable, such as a purchase, sign-up, page view, or lead. Advertisers have the option to exclude your site from their campaigns and may do so if it is not leading to conversions.

We believe these guidelines invest in the long-term health of the relationship between AdSense publishers, AdWords advertisers, and your sites' visitors, and that they will help ensure your continued success in the AdSense program.

Jumat, 04 April 2008

Testing the Network Connectivity

From now on, the '/ping' command can be used to test the network connectivity on both interfaces. You can reach any host on both connected networks from the router:

[MikroTik] ip address> /ping 10.1.1.17
10.1.1.17 pong: ttl=255 time<1 ttl="255" ttl="255" max =" 0/0.0/0"> /ping 192.168.0.1
192.168.0.1 pong: ttl=255 time<1 ttl="255" ttl="255" max =" 0/0.0/0">

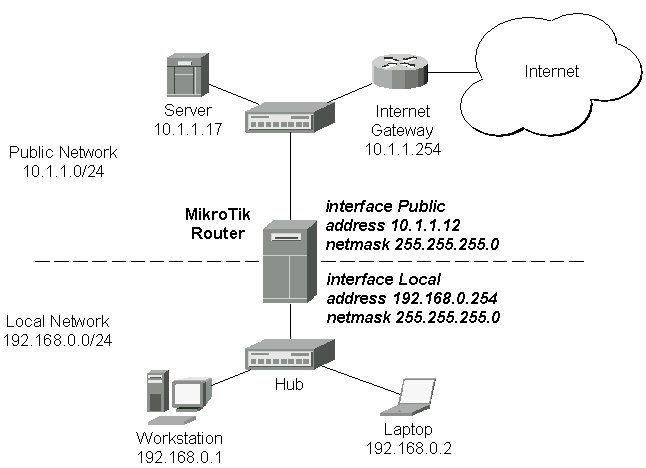
The workstation and the laptop can reach (ping) the router at its local address 192.168.0.254, whereas the server can reach the router at its local address 10.1.1.12. The router's address 192.168.0.254 should be specified as the default gateway in the TCP/IP configuration of both the workstation and the laptop. Then you should be able to ping the router's address 10.1.1.12, which is on the ISP's network:

C:\>ping 10.1.1.12
Pinging 10.1.1.12 with 32 bytes of data:
Reply from 10.1.1.12: bytes=32 time<10ms ttl="255" bytes="32" ttl="255" bytes="32" ttl="255">

However, you cannot ping the workstation and laptop from the server, unless you do the following:

  • Add a static route on the ISP's gateway, which specifies the host 10.1.1.12 as the gateway to network 192.168.0.0/24. Then all hosts on the ISP's network, including the server, will be able to communicate with the hosts on the LAN.
  • Alternatively, specify the address 10.1.1.12 as the default gateway for the server. Then the server will forward packets with destination other than 10.1.1.0/24 to the MikroTik router.
It is required that you have some knowledge of configuring TCP/IP networks. There is a comprehensive list of IP resources compiled by Uri Raz at http://www.private.org.il/tcpip_rl.html We strongly recommend that you obtain more knowledge, if you have difficulties configuring your network setups. Next will be discussed situation with 'hiding' the private LAN 192.168.0.0/24 'behind' one address 10.1.1.12 given to you by the ISP.

Senin, 31 Maret 2008

Configuring the Default Route

You can see two dynamic (D) kernel (K) routes, which have been added automatically when the addresses were added:

[MikroTik] ip route> print                                                    
Flags: X - disabled, I - invalid, D - dynamic, R - rejected
# TYPE DST-ADDRESS NEXTHOP-S... GATEWAY DISTANCE INTERFACE
0 D connect 192.168.0.0/24 A 0.0.0.0 0 Local
1 D connect 10.1.1.0/24 A 0.0.0.0 0 Public
[MikroTik] ip route> print detail
Flags: X - disabled, I - invalid, D - dynamic, R - rejected
0 D dst-address=192.168.0.0/24 gateway=0.0.0.0 nexthop-state=A
preferred-source=192.168.0.254 interface=Local distance=0 type=connect

1 D dst-address=10.1.1.0/24 gateway=0.0.0.0 nexthop-state=A
preferred-source=10.1.1.12 interface=Public distance=0 type=connect

[MikroTik] ip route>

These routes show, that IP packets with destination to 10.1.1.0/24 would be sent through the interface Public, whereas IP packets with destination to 192.168.0.0/24 would be sent through the interface Local. However, you need to specify where the router should forward packets, which have destination other than networks connected directly to the router. This is done by adding the default route (destination 0.0.0.0, netmask 0.0.0.0). In this case it is the ISP's gateway 10.1.1.254, which can be reached through the interface Public:

[MikroTik] ip route> add gateway=10.1.1.254      
[MikroTik] ip route> print
Flags: X - disabled, I - invalid, D - dynamic, R - rejected
# TYPE DST-ADDRESS NEXTHOP-S... GATEWAY DISTANCE INTERFACE
0 static 0.0.0.0/0 A 10.1.1.254 1 Public
1 D connect 192.168.0.0/24 A 0.0.0.0 0 Local
2 D connect 10.1.1.0/24 A 0.0.0.0 0 Public
[MikroTik] ip route>

Here, the default route is listed under #0. As we see, the gateway 10.1.1.254 can be reached through the interface 'Public'. If the gateway would have been specified incorrectly, the value for the argument 'interface' would be unknown. Note, that you cannot add two routes to the same destination, i.e., destination-address/netmask! It applies to the default routes as well. Instead, you can enter multiple gateways for one destination. For more information on IP routes, please read the relevant topic in the Manual.

If you have added an unwanted static route accidentally, use the 'remove' command to delete the unneeded one. Do not remove the dynamic (D) routes! They are added automatically and should not be deleted 'by hand'. If you happen to, then reboot the router, the route will show up again.

Selasa, 18 Maret 2008

Adding Addresses

Assume you need to configure the MikroTik router for the following network setup:


Please note that the addresses assigned to different interfaces of the router should belong to different networks. In the current example we use two networks:

  • The local LAN with network address 192.168.0.0 and 24-bit netmask 255.255.255.0 The router's address is 192.168.0.254 in this network.
  • The ISP's network with address 10.1.1.0 and 24-bit netmask 255.255.255.0 The router's address is 10.1.1.12 in this network.
The addresses can be added and viewed using the following commands:

[MikroTik] ip address> add address 192.168.0.254/24 interface Local
[MikroTik] ip address> add address 10.1.1.12/24 interface Public
[MikroTik] ip address> print
Flags: X - disabled, I - invalid, D - dynamic
# ADDRESS NETWORK BROADCAST INTERFACE
0 192.168.0.254/24 192.168.0.0 192.168.0.255 Local
1 10.1.1.12/24 10.1.1.0 10.1.1.255 Public
[MikroTik] ip address>

Here, the network mask has been specified in the value of the address argument. Alternatively, the argument 'netmask' could have been used with the value '255.255.255.0'. The network and broadcast addresses were not specified in the input since they could be calculated automatically.


Mikrotik : Working with Interfaces

Before configuring the IP addresses and routes please check the '/interface' menu to see the list of available interfaces. If you have PCI Ethernet cards installed in the router, it is most likely that the device drivers have been loaded for them automatically, and the relevant interfaces appear on the '/interface print' list, for example:

[MikroTik] interface> print                                                   
Flags: X - disabled, D - dynamic
# NAME MTU TYPE
0 X ether1 1500 ether
[MikroTik] interface>

The device drivers for NE2000 compatible ISA cards need to be loaded using the 'add' command under the /drivers menu. For example, to load the driver for a card with IO address 0x280 and IRQ 5, it is enough to issue the command:

[MikroTik] driver> add name=ne2k-isa io=0x280                                      
[MikroTik] driver> print
Flags: I - invalid, D - dynamic
# DRIVER IRQ IO MEMORY ISDN-PROTOCOL
0 D PCI NE2000
1 ISA NE2000 280
[MikroTik] driver>

The interfaces need to be enabled, if you want to use them for communications. Use the '/interface enable name' command to enable the interface with a given name, for example:

[MikroTik] interface> print                                                   
Flags: X - disabled, D - dynamic
# NAME MTU TYPE
0 X ether1 1500 ether
1 X ether2 1500 ether
[MikroTik] interface> enable 0
[MikroTik] interface> enable ether2
[MikroTik] interface> print
Flags: X - disabled, D - dynamic
# NAME MTU TYPE
0 ether1 1500 ether
1 ether2 1500 ether
[MikroTik] interface>

You can use the number or the name of the interface in the 'enable' command.

The interface name can be changed to a more descriptive one by using the '/interface set' command:

[MikroTik] interface> set 0 name=Public                                           
[MikroTik] interface> set 1 name=Local
[MikroTik] interface> print
Flags: X - disabled, D - dynamic
# NAME MTU TYPE
0 Public 1500 ether
1 Local 1500 ether
[MikroTik] interface>

Use of the 'setup' Command

The initial setup of the router can be done by using the '/setup' command which enables an interface, assigns an address/netmask to it, and configures the default route. If you do not use the setup command, or need to modify/add the settings for addresses and routes, please follow the steps described below.

Navigating the Terminal Console

After logging into the router you will be presented with the MikroTik RouterOS Welcome Screen and command prompt, for example:

  MMM      MMM       KKK                          TTTTTTTTTTT      KKK
MMMM MMMM KKK TTTTTTTTTTT KKK
MMM MMMM MMM III KKK KKK RRRRRR OOOOOO TTT III KKK KKK
MMM MM MMM III KKKKK RRR RRR OOO OOO TTT III KKKKK
MMM MMM III KKK KKK RRRRRR OOO OOO TTT III KKK KKK
MMM MMM III KKK KKK RRR RRR OOOOOO TTT III KKK KKK

Mikrotik RouterOS v2.4 (c) 1999-2001 http://www.mikrotik.com/
[MikroTik] >

The command prompt shows the identity name of the router and the current menu level, for example:

[MikroTik] >                          Base level menu
[MikroTik] interface> Interface configuration
[MikroTik] ip firewall static-nat> NAT rule management

The list of available commands at any menu level can be obtained by entering the question mark '?', for example:

[MikroTik] > ?
bridge Bridge settings
driver Driver management
e-mail sending e-mail from router
export print configuration as set of router commands
file Local router file storage.
import Run exported configuration script
interface Interface configuration
ip IP protocol settings
log System logs
password Change password
ping Send ICMP Echo packets
port Serial ports
quit Quit console
redo Redo previosly undone action
restore Restore previously backed up configuration
routing Routing protocol configuration
setup Do basic setup of system
system System information and utilities
tool Diagnostics tools
undo Undo previous action
user User management
[MikroTik] > ip ?
accounting Traffic accounting
address Address management
arp ARP entries management
dhcp-client DHCP client settings
dhcp-server DHCP server settings
dns DNS settings
export print configuration as set of router commands
firewall Firewall management
neighbor Neighbor discovery
packing IP Packet Packing setup
policy-routing Policy routing setup
ppp PPP general settings
queue Bandwidth management
route Route management
service
[MikroTik] >

The list of available commands and menus has short descriptions next to the items. You can move to the desired menu level by typing its name and hitting the [Enter] key, for example:

[MikroTik]>                      Base level menu
[MikroTik]> driver Enter 'driver' to move to the driver level menu
[MikroTik] driver> / Enter '/' to move to the base level menu from any level
[MikroTik]> interface Enter 'interface' to move to the interface level menu
[MikroTik] interface> /ip Enter '/ip' to move to the IP level menu from any level
[MikroTik] ip>

A command or an argument does not need to be completed, if it is not ambiguous. For example, instead of typing 'interface' you can type just 'in' or 'int'. To complete a command use the [Tab] key.

The commands may be invoked from the menu level, where they are located, by typing its name. If the command is in a different menu level than the current one, then the command should be invoked using its full or relative path, for example:

[MikroTik] ip route> print                  Prints the routing table
[MikroTik] ip route> .. address print Prints teh IP address table
[MikroTik] ip route> /ip address print Prints teh IP address table

The commands may have arguments. The arguments have their names and values. Some arguments, that are required, may have no name. Below is a summary on executing the commands and moving between the menu levels:

       Command                               Action
command [Enter] Execute the command
[?] Show the list of all available commands
command [?] Display help on the command and the list of arguments
command argument [?] Display help on the command's argument
[Tab] Complete the command/word. If the input is ambiguous, a
second gives possible options
/ Move up to the base level
/command Execute the base level command
.. Move up one level
"" Enter an empty string
"word1 word2" Enter 2 words that contain a space

You can abbreviate names of levels, commands and arguments.

For the IP address configuration, instead of using the 'address' and 'netmask' arguments, in most cases you can specify the address together with the number of bits in the network mask, i.e., there is no need to specify the 'netmask' separately. Thus, the following two entries would be equivalent:

/ip address add address 10.0.0.1/24 interface ether1
/ip address add address 10.0.0.1 netmask 255.255.255.0 interface ether1

However, if the netmask argument is not specified, you must specify the size of the network mask in the address argument, even if it is the 32-bit subnet, i.e., use 10.0.0.1/32 for address 10.0.0.1 and netmask 255.255.255.255

MikroTik Wireless Configuration

Setup uses Safe Mode. It means that all changes that are made during setup
are reverted in case of error, or if Ctrl-C is used to abort setup. To keep
changes exit setup using the ‘x’ key.
[Safe Mode taken]

Choose options by pressing one of the letters in the left column, before
dash. Pressing ‘x’ will exit current menu, pressing Enter key will select the
entry that is marked by an ‘*’. You can abort setup at any time by pressing
Ctrl-C.

Entries marked by ‘+’ are already configured.
Entries marked by ‘-’ cannot be used yet.
Entries marked by ‘X’ cannot be used without installing additional packages.
r - reset all router configuration
+ l - load interface driver
+ a - configure ip address and gateway
d - setup dhcp client
+ s - setup dhcp server
p - setup pppoe client
t - setup pptp client
* x - exit menu
your choice:
OR
[admin@MikroTik] > ip address
[admin@MikroTik] ip address> add address=192.168.1.1/24 interface=ether1
[admin@MikroTik] ip address> pr
# ADDRESS NETWORK BROADCAST INTERFACE
0 192.168.1.1/24 192.168.1.0 192.168.1.255 ether1
admin@MikroTik] ip address> /
[admin@MikroTik] >
[admin@MikroTik] >interface
[admin@MikroTik] interface> pr
Flags: X - disabled, D - dynamic, R - running
# NAME TYPE RX-RATE TX-RATE MTU
0 X ether1 ether 0 0 1500
1 X wlan1 wlan 0 0 1500
[admin@MikroTik] interface> enable 0
[admin@MikroTik] interface> enable 1

[admin@MikroTik] interface> pr
Flags: X - disabled, D - dynamic, R - running
# NAME TYPE RX-RATE TX-RATE MTU
0 R ether1 ether 0 0 1500
1 X wlan1 wlan 0 0 1500
[admin@MikroTik] ip address>add address=172.1.2.1/30 interface=wlan1
[admin@MikroTik] interface eoip>
[admin@MikroTik] interface eoip>add name=eoip-tunnel1 remote-address=172.1.2.2 tunnel-id=1 disabled=no arp=enabled
[admin@MikroTik] interface eoip>pr
Flags: X - disabled, R - running
0 R name=”eoip-tunnel1″ mtu=1500 mac-address=FE:FD:00:00:00:00 arp=enabled remote-address=172.1.2.2 tunnel-id=1
[admin@MikroTik] interface eoip>..
[admin@MikroTik] interface>
[admin@MikroTik] interface> bridge
[admin@MikroTik] interface bridge> add name=bridge1
[admin@MikroTik] interface bridge>pr
Flags: X - disabled, R - running
0 R name=”bridge1″ mtu=1500 arp=enabled mac-address=00:00:00:00:00:0 forward-protocols=ip,arp,appletalk,ipx,ipv6,other stp=no priority=32768 ageing-time=5m forward-delay=15s garbage-collection-interval=4s hello-time=2s max-message-age=20s
[admin@MikroTik] interface bridge>port
[admin@MikroTik] interface bridge port>pr
# INTERFACE BRIDGE PRIORITY PATH-COST
0 ether1 none 128 10
1 eoip-tunnel1 none 128 10
2 wlan1 none 128 10
[admin@MikroTik] interface bridge port>set eoip-tunnel1 bridge=bridge1
[admin@MikroTik] interface bridge port>set ether1 bridge=bridge1
[admin@MikroTik] interface bridge port>pr
# INTERFACE BRIDGE PRIORITY PATH-COST
0 ether1 bridge1 128 10
1 eoip-tunnel1 bridge1 128 10
3 wlan1 none 128 10
[admin@MikroTik] interface bridge port>.. ..
[admin@MikroTik] interface>wireless
[admin@MikroTik] interface wireless>set wlan1 mode=bridge disable-running-check=no band=5ghz frequency=5180 ssid=test1
Configurration For Mikrotik Station / Client
[admin@MikroTik] interface eoip>add name=eoip-tunnel1 remote-address=172.1.2.1 tunnel-id=1 disabled=no arp=enabled
[admin@MikroTik] interface wireless>set wlan1 mode=station disable-running-check=no band=5ghz frequency=5180 ssid=test1
[admin@MikroTik] interface>pr
Flags: X - disabled, D - dynamic, R - running
# NAME TYPE RX-RATE TX-RATE MTU
0 R ether1 ether 0 0 1500
1 R bridge1 bridge 0 0 1500
2 R eoip-tunnel1 eoip-tunnel 0 0 1500
3 R wlan1 wlan 0 0 1500


Mikrotik Transparant Proxy

setting transparant web proxy server

1. first se t web proxy
/ ip web-proxy
set enabled=yes –>> to make ip web proxy enable
set src-address=0.0.0.0 –>> to make source address to access web proxy will allow
set port=8080 –>> to make port for web proxy
set hostname=”proxy.war.net.id” –>> setting for visble hostname web proxy
set transparent-proxy=yes –>> make transparant proxy enable
set parent-proxy=0.0.0.0:0–>> if we used parent proxy x
set cache-administrator=”support@somethink.org” –>> make set administrator info support
set max-object-size=4096KiB –>> maximal object can cacth with the proxy server
set cache-drive=system –>> where drive position that cache wil be saved
set max-cache-size=unlimited –>> maximal harddrive we used for cache
set max-ram-cache-size=unlimited –>> maximal ram we used for cache

2. add nat for redirect port for squid to make transparant

/ip firewall nat add chain=dstnat protocol=tcp dst-port=80 action=redirect to-ports=8080 –>> setting can redirect port 80 to 8080 for proxy server
/ip firewall nat add chain=dstnat protocol=tcp dst-port=3128 action=redirect to-ports=8080 –>> setting can redirect port 3128 to 8080 for proxy server
/ip firewall nat add chain=dstnat protocol=tcp dst-port=8080 action=redirect to-ports=8080 –>> setting can redirect port 8080 to 8080 for proxy server

14 Step Configuration of Mikrotik using ADSL

This articel i explain how to configuration mikrotik using pc for router.

1. Configuration position of ADSL connection
modem —Mikrotik—-Switch —– Client
|
Client

a. Modem IP –>> 192.168.1.1

b. Mikrotik Using 2 Interface - Ether1 —->> 192.168.1.2

- Ether2 —->> 192.168.0.254

c. Switch — Client ip 192.168.0.1-253

2. Configuration step router pc mikrotik

a. add ip address to interface 1

/ip address add interface=ether1 address = 192.168.1.1 netmask= 255.255.255.0

b. add ip address to interface2

/ip address add interface=ether2 address = 192.168.0.1 netmask= 255.255.255.0

c. to see input of interface

/interface print

d. Set Value name off interface

/inteface set 0 name=”Public” –>> For Modem
/inteface set 1 name=”Lan” –>> For Lan

e. set routing for net ( modem )

/ip route add gateway=192.168.0.1

f. set dns server ISP

/ip dns set primary-dns=203.130.193.74 secondary-dns=202.134.0.155

/ip dns set allow-remote-requests=yes

g. set of nat the router pc to sharing bw to lan

/ip firewall nat add chain=srcnat out-inteface=Public action=masquerade

MikroTik RouterOS

MikroTik RouterOS turns a standard PC computer into a powerful network router. Just add standard network PC interfaces to expand the router capabilities.

  • Remote control with easy real-time Windows application (WinBox)
  • Telnet/SSH/console/serial console control with RADIUS authentication
  • Advanced bandwidth control
  • Network firewall with packet-filtering, masquerading, network address translation, logging and connection monitoring
  • DHCP support
  • HotSpot gateway with RADIUS authentication
  • Ethernet 10/100/1000Mb/s
  • Wireless client and Access Point 2.4GHz 11Mb/s (IEEE802.11b), 5GHz 54Mb/s (IEEE802.11a) and 2.4GHz 54Mb/s (IEEE802.11g) with RADIUS authentication for AP
  • V.35 synchronous 8.448Mb/s with Sync-PPP, HDLC or Frame Relay
  • X.21 synchronous 8.448Mb/s with Sync-PPP, HDLC or Frame Relay
  • Async PPP (up to 128 ports) with RADIUS authetication for modem pools
  • E1/T1 support
  • IP Telephony Gateway
  • Built-in Web-proxy
  • And much more
  •